

Mastering the Push-Up: A Physical Therapist’s Guide to Building Functional Strength
Looking to improve your push-up form or build strength safely after injury? In this physical therapist-approved guide, you'll learn how to master push-ups from beginner to advanced. Discover key form tips, injury-prevention strategies, functional strength benefits, and push-up progressions you can do anywhere. Whether you're just starting out or ready to level up, this full-body exercise guide will help you move better and feel stronger.
If you're looking for a simple yet powerful way to build full-body strength, the push-up is hard to beat. While it's best known as an upper-body exercise, a well-executed push-up also engages your core, and even your legs—making it a true full-body movement.
From a physical therapy perspective, push-ups aren’t just about strength—they’re also about function. The ability to push yourself up off the floor is a critical component of daily movement, especially as we age or recover from injury. Even better? Push-ups are incredibly versatile and require no equipment, making them a perfect addition to your workout routine whether you're at home, in the gym, or on the road.
✅ Why Push-Ups Matter for Functional Strength
Push-ups mimic a fundamental human movement—pushing yourself away from the ground. This makes them ideal for developing functional upper-body strength, which supports everything from getting up off the floor to pushing heavy things to bracing during a fall. And because they activate multiple muscle groups, they’re a time-efficient way to improve core stability, postural control, and joint coordination.
🧠 Common Push-Up Mistakes & Physical Therapy Tips for Better Form
As physical therapists, we often see patients performing push-ups with improper form. Good technique is crucial not only for performance but also for injury prevention. Here are five key form tips we recommend:
Hand Placement: Position your hands in line with—or just slightly outside—your shoulders.
Elbow Positioning: Tuck your elbows in close to your body. Avoid letting them flare straight out.
Core Engagement: Keep your core tight and your hips in line with your shoulders—no sagging or hiking!
Neck Relaxation: Avoid gripping with your neck or shrugging your shoulders. Keep your neck neutral and relaxed.
Shoulder Blade Mechanics: Don't round your shoulders forward or pinch your shoulder blades together. Instead, focus on maintaining contact between your shoulder blades and your back while allowing them to move naturally.
🌱 Just Getting Started? Try This Push-Up Progression
If you're new to push-ups or rebuilding strength after an injury, starting with modifications is the safest and smartest approach. Gradual progression helps condition your muscles and joints while reducing the risk of strain.
Here’s a safe, therapist-approved push-up progression:
Wall Push-Ups – Start upright with hands on a wall.
Countertop Push-Ups – Lower the angle using a kitchen counter.
Coffee Table Push-Ups – Bring hands lower as strength improves.
Knee Push-Ups on Floor – Full push-up motion with bent knees.
Negative Push-Ups on Floor – Lower down on feet, push up on knees.
Band-Assisted Push-Ups – Use a resistance band around the chest for support.
Standard Push-Ups – Full movement on hands and feet.
🌶️ Ready to Level Up? Advanced Push-Up Variations
Once you’ve mastered the basics, you can add variety to challenge different muscles and movement patterns. These advanced push-up variations increase intensity and enhance your neuromuscular control:
Eccentric Push-Up – Lower slowly (3–5 seconds) and push up quickly to target different muscle fibers.
Ball Push-Up – Place one hand on a ball to challenge balance and unilateral strength.
Sliding Push-Up – Slide one hand out while lowering, and pull it back in while pressing up. This boosts core engagement and shoulder stability.
All of these can be done from your knees or feet depending on your strength level.
💪 What Muscles Do Push-Ups Work?
Push-ups are a compound movement, meaning they engage multiple muscle groups:
Pectoralis Major (chest)
Triceps Brachii
Anterior Deltoids (front shoulders)
Serratus Anterior (scapular stabilizer)
Core Muscles (abdominals and lower back)
These muscles work together to stabilize the body, protect your joints, and power the pushing motion.
👟 Final Thoughts: Start Where You Are
Don’t be discouraged if you’re not ready for a full push-up right away. Progression is the key to sustainable strength gains and injury prevention. Begin with the level that feels challenging but doable, and gradually build from there.
If you’re unsure where to start or need guidance due to pain or a previous injury, our team of licensed physical therapists is here to help you move safely and effectively.
Ready to improve your push-up form or progress to the next level?
Contact us today to schedule a consultation and get a personalized plan from our expert PTs.

Rewiring Movement: Why Repetition is Key to Lasting Change
Ever wonder why quick fixes don’t last? Discover the science behind lasting change in movement patterns and why repetition is key. Learn how your brain creates new neural circuits, how tissues adapt, and why consistency leads to automatic, healthier habits.
Building Better Habits Through Practice, Patience, and Perseverance
These days it seems like you can always find someone who is promoting a quick fix. Rarely is it ever the case that you can do one thing and magically you will feel better.
You can certainly modify body positioning and activation patterns quickly through a variety of exercises which may help to immediately decrease pain and improve your ability to function. But as creatures of habit, we typically revert to some of our typical patterns easily.
Therefore, it takes repetition to build new neuronal circuits within our brain and create longer lasting changes of movement pattern and muscle activation within our bodies. I’m going to break that down a little more because that terminology may be confusing to some people.
When we do an action, we have nerves within our bodies that carry messages from our brain down to the target muscles to help create that movement. We have preprogrammed patterns that we automatically revert to when we do things, and this helps with efficiency. Therefore, we don’t even have to think about every single thing when we do it.
Think about walking while you are talking. You don’t have to consciously think about how to lift each foot up, place it down and move forwards onto it. You can do it automatically so that this frees up the mental capacity to be able to also talk during this or do anything else. So these circuits fire automatically without us even thinking about it and this means that these are the same patterns that we are used to using out of habit. If we want to change our movement patterns, we need to practice and repeat things over and over to help create a new connection within our brain and body so that when we do something automatically, we use the new pattern instead!
Another side of this includes the physical changes that happen within our bodies when we make these new changes. Our tissues- think skin, muscle, fascia, and tendons— all need to accommodate for these changes. They may have to lengthen or shorten based upon our new movement pattern and this takes time because they literally have to rebuild themselves to be in the structure that we are asking them to be in
So, if you don’t see changes immediately when you are beginning something new that is ok! It takes practice and repetition in order to make something a habit and then we don’t even have to think about it, it’s automatic.
Is there anything you’re working on to make a habit?

Stretching Part 2, The Classic Stretches
Here are some basic stretches that inflexible people can add to their daily routine.
In our last post we talked about how to “stretch” a muscle by moving through a range of motion actively. Here we want to talk about static stretching.
As a reminder, this is good for those people who have been inflexible since the beginning of time. See the previous post to determine if this is you.
Again, the most common areas that we see tightness are the back of the hips (gluteal muscles) and the quads. So, including these muscles in your stretches would be helpful. In tight people, we often see calf tightness as well and this would be good to include.
How long should you hold each stretch? Hold each stretch for at least 30 seconds, ideally 1 minute. This helps to induce what we call creep within the tissue. This essentially is lasting elongation of the collagen fibers. If you hold the stretch less than this amount of time, the muscle can rebound with more tightness.
How many reps? 1-2 reps per stretch
When to do these exercises/stretches? These stretches are best done when warm after exercise, though some people enjoy doing them at the end of the day as a wind-down process before bed.
Below are some examples of stretches:
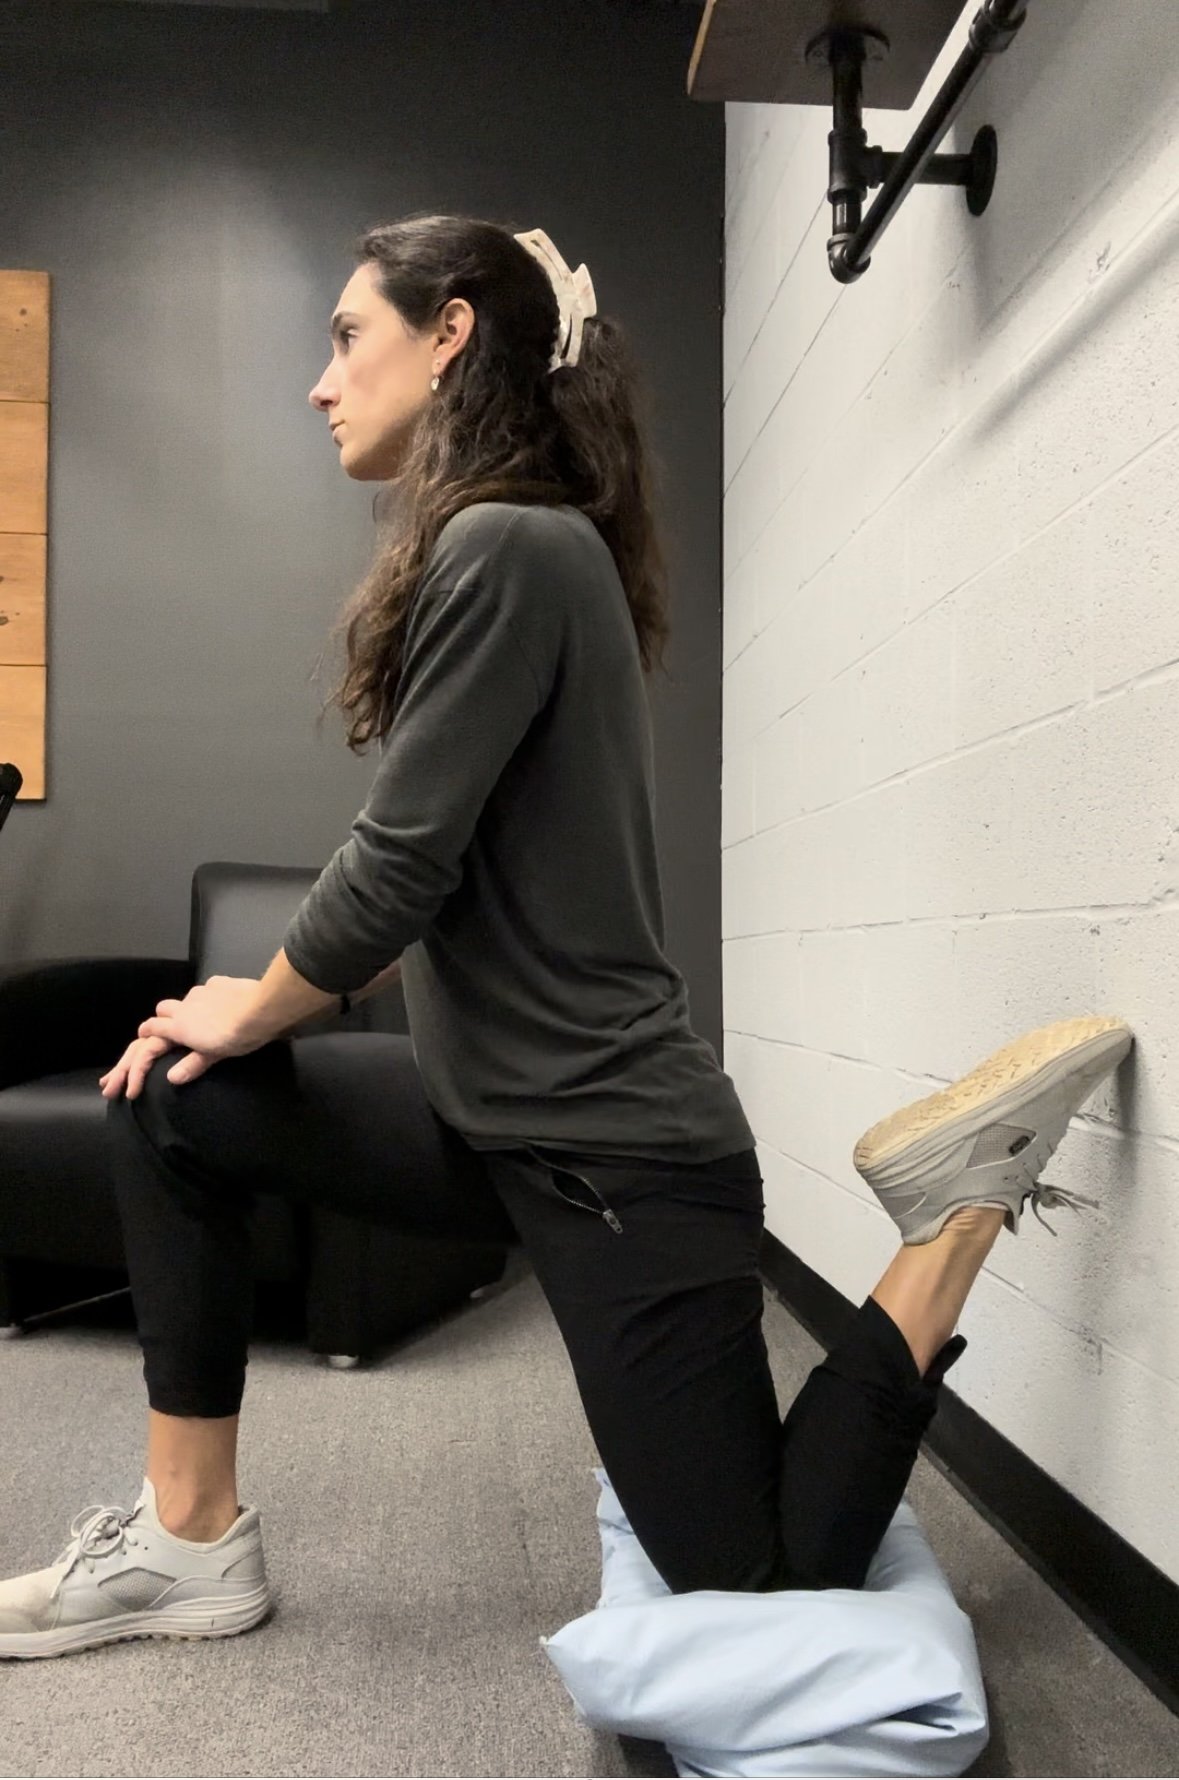
Quad stretch at the wall: Kneel on the floor facing away from the wall. Place one foot on the floor in front of you and the other knee will be on the floor behind you. Then, if you are able to place your foot of the back leg behind you on the wall, place it there. If not, you can place your foot on a lower surface like a stacked pillow. Then lift your chest up and tuck your pelvis under so that you are not tilting forwards. Hold 30 sec-1 min, 1-2x/side
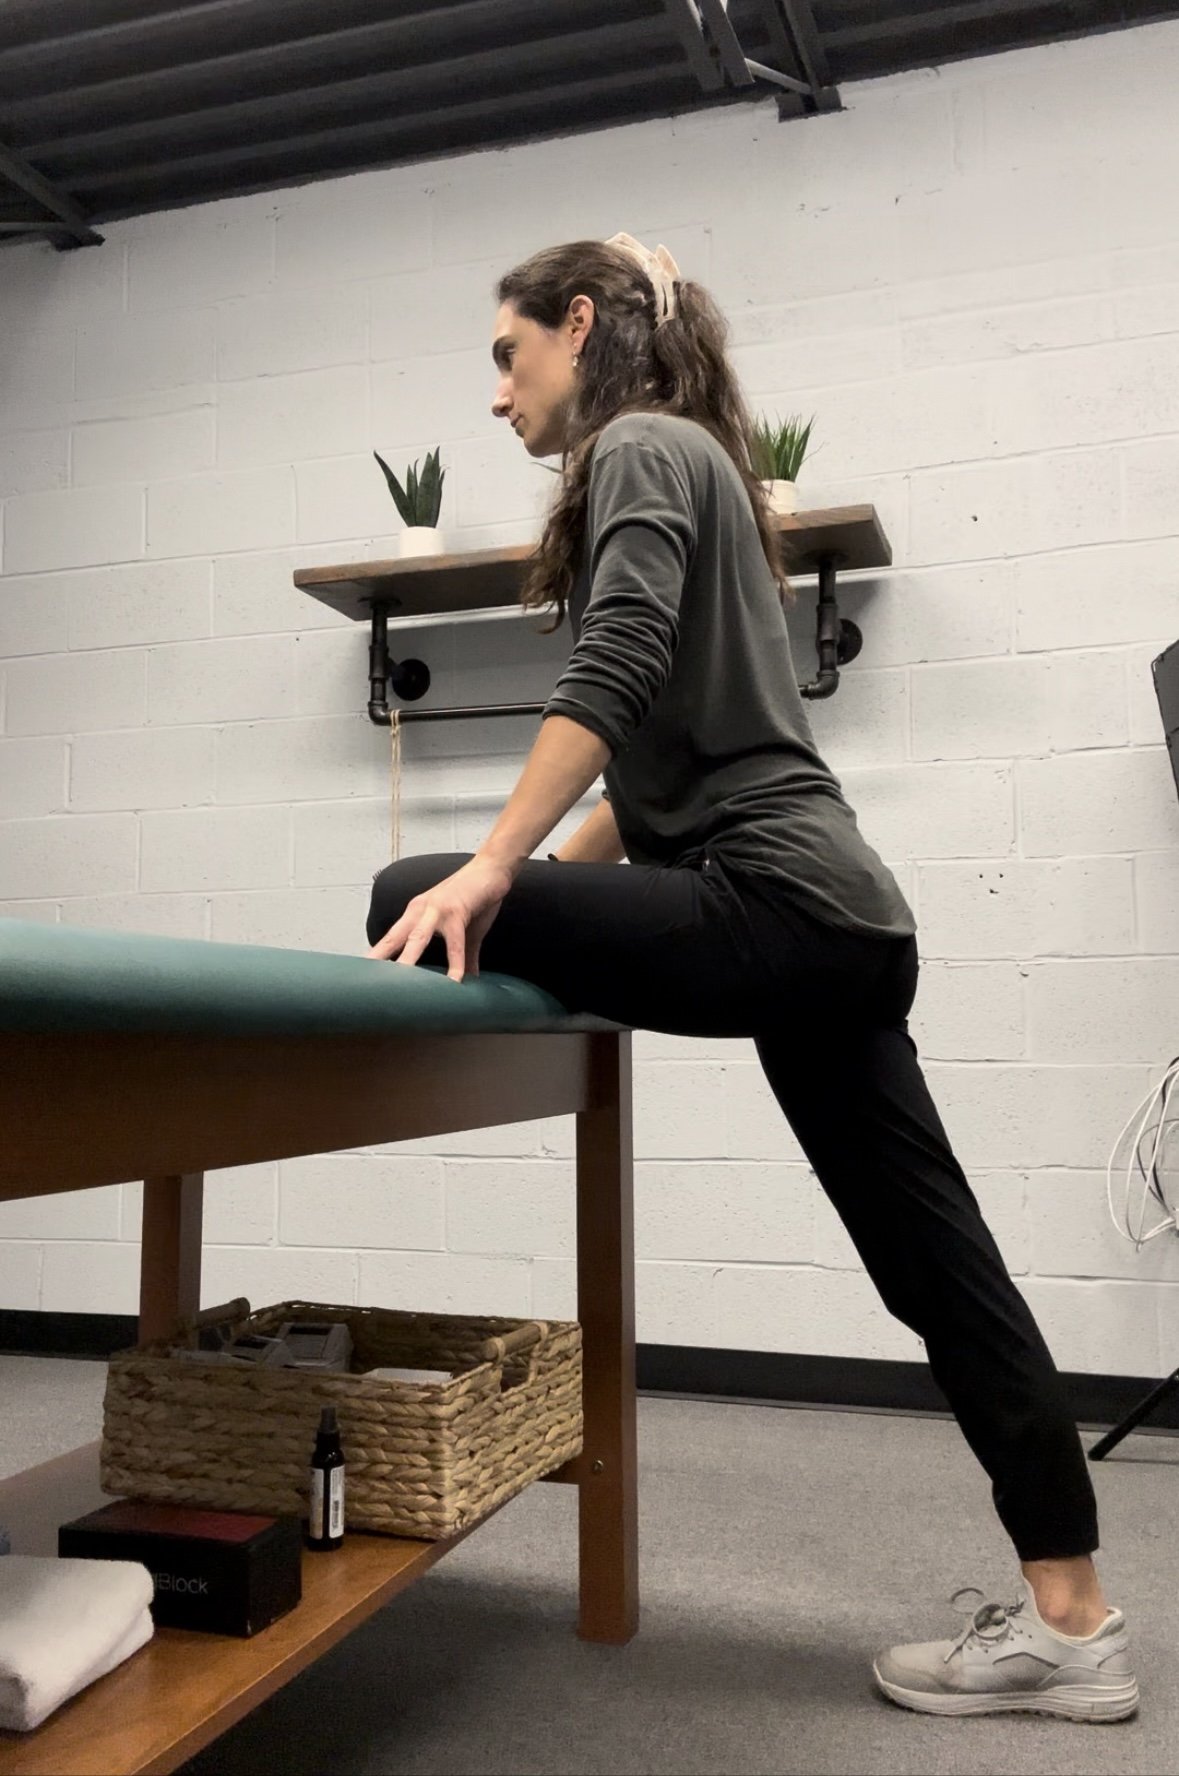
Modified Pigeon: stretch on a bed or table: Place one leg in front of you with your knee out to the side and your foot closer to midline. This leg will be placed on top of a tall table or bed and you will be standing on the other leg which will be slightly in back of you. Keep your hips facing forwards without rotating to one side or the other. If this is too much of a stretch you may place a pillow beneath your knee of the front leg. Hold for 30 sec-1 min, 1-2x/side.
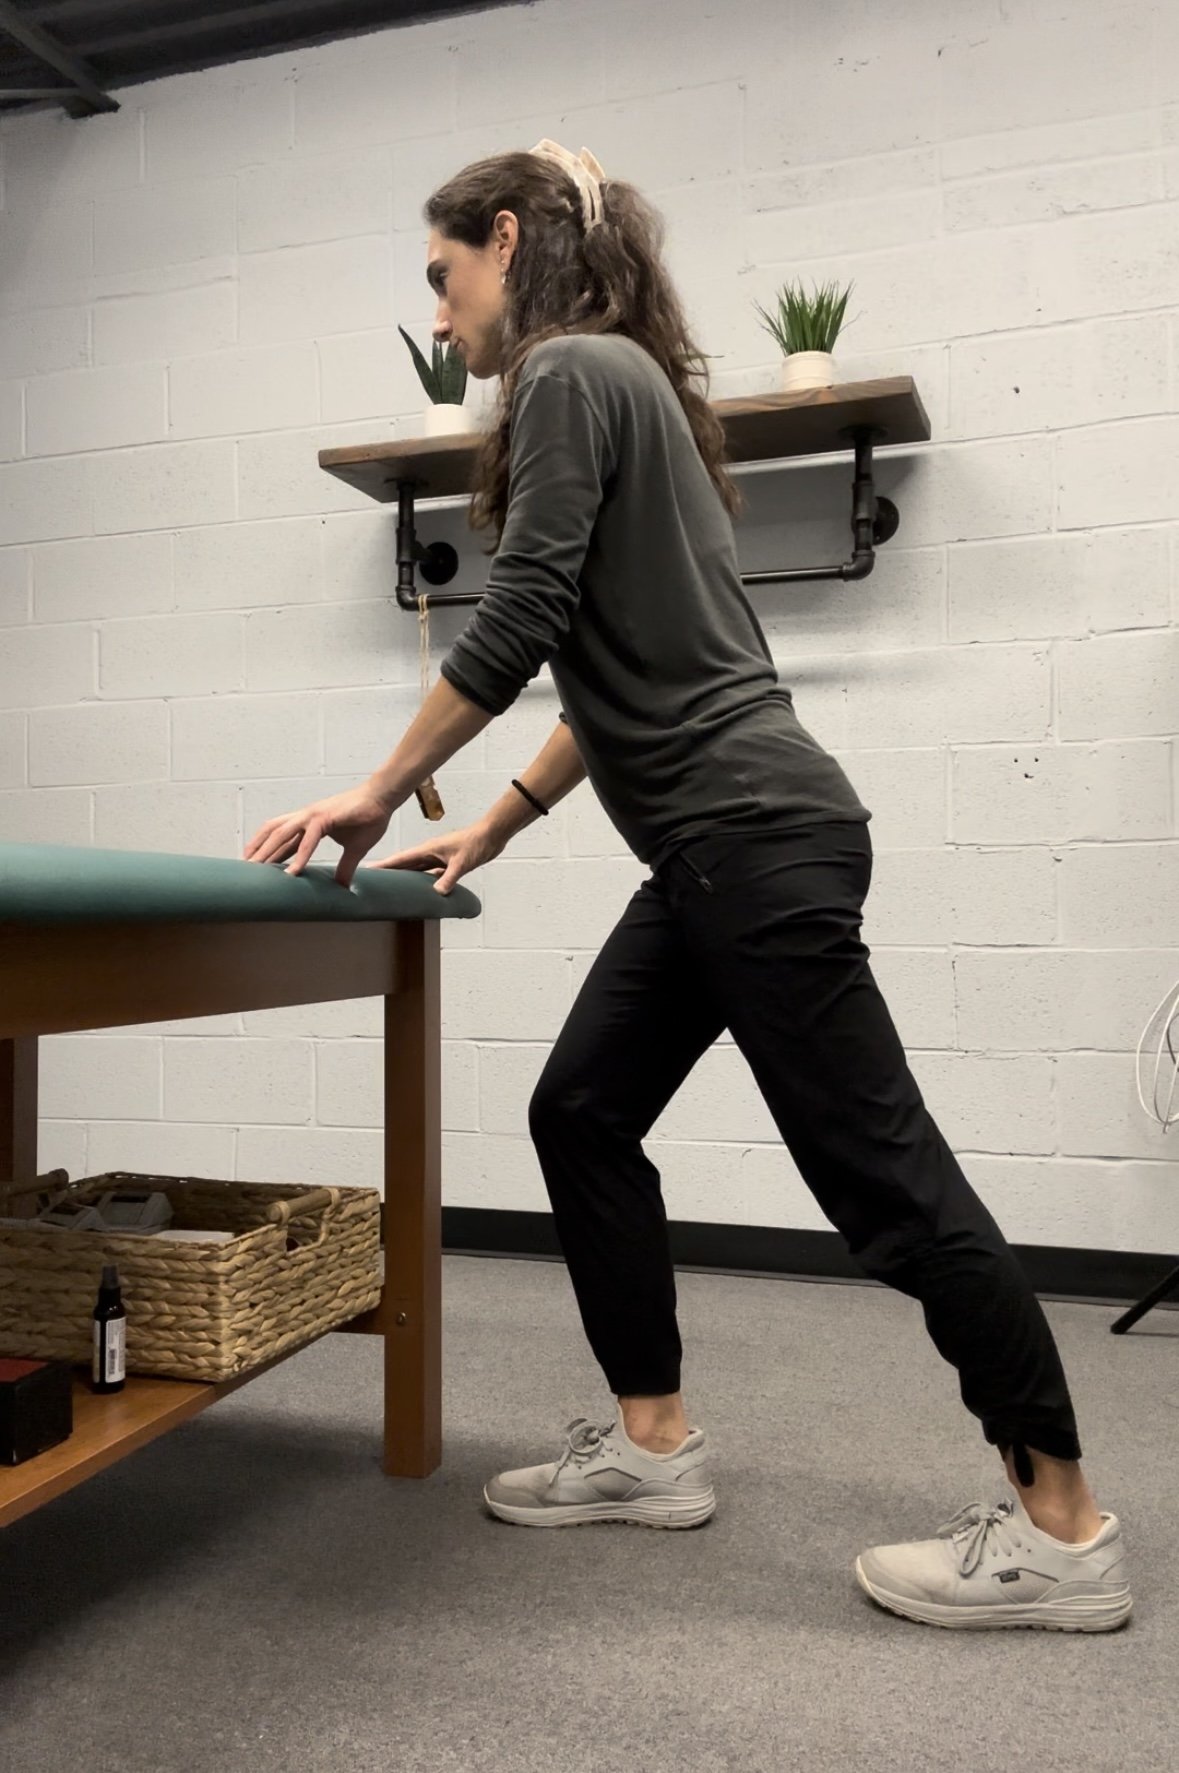
Calf stretch: stand with your legs staggered and one leg behind you. For the back leg, keep your knee straight and your heel and toes on the ground. The knee of the front leg will be bent. Make sure both feet are facing forwards instead of rotating out or caving in to one side. Hold for 30 sec- 1 min, 1-2x/side

Streeeetching, shouldn't everyone do it?
This blog post gives guidance on who should stretch and who shouldn’t. Classic stretching is not for everyone! Read the post to see where you fit in…
Many people feel tight some place in their body. So logically, we as PTs often get asked all sorts of questions about stretching. How do I stretch? How much should I stretch? When should I stretch? What muscles are the most important to stretch?
Who knew there would be so many questions about stretching! Why wouldn’t there be though? We don’t typically learn about all these things in high school gym class.
Here we are to help!
First, every one may not need to stretch.
Yes, you read that correctly. Everyone may not need to stretch.
Each person’s body is different and requires different things to help keep it mobile and feeling good.
There are some people who are naturally inflexible. They’ve been inflexible since they were in diapers. Just kidding, but seriously, these people know they have not been flexible since a young age.
These are the individuals that likely need to stretch. (The next post will give details to these people).
There are other people who are naturally extremely flexible. When these people were young, they were able to put their foot behind their heads and easily become a pretzel. These people are tricky though because as they age their flexibility may turn into tightness.
One would naturally think that these people must need stretching now since they once were flexible but are now inflexible. Not necessarily! The loss of range of motion can purely be because their joints aren’t being lubricated like they once were. How many people sit at a desk all day and don’t do much movement? When we were kids, recess was built into our day as a time to move and climb and explore. No wonder we were so mobile!
So, one part of the solution is purely getting moving more. The other piece of the puzzle is these people’s muscles may be tightening around a joint to help provide stability in response to lack of strength and muscle coordination. In this case, these people can stretch and stretch and stretch, but the tightness persists or even worse the muscle has an injury.
For this type of person, static prolonged holds for stretching may not be the best fit.
What is recommended though is doing exercises through a full range of motion to lengthen the muscle and then shorten it.
This provides the muscle the capability to lengthen under tension which creates long lasting changes.
This helps the body to feel safe as you are actively lengthening your muscle. Instead of the muscle reacting with more tension and tightness like static stretching may do, the muscle is able to relax and lengthen.
This type of lengthening of the muscle is not only good for the flexible people, but also the inflexible people and all of those who are in-between.
So, for the mobility exercises that will help create length (aka more flexibility) here are the answers to the questions above:
How long should you do these exercises? Start with higher repetitions with these exercises at first to help re-educate the muscle (let’s say 15 reps) and then you can move to adding resistance with lower repetitions (enough resistance for around 5-6 reps).
How many sets? 2-3 sets of these exercises to help make changes.
When to do these exercises/stretches? During a warm-up prior to exercising is best.
What muscles are the most important? We often see the back of the hips (gluteal muscles) and quads as the tightest so it’s often beneficial to start there.
Below are some examples of creating this length while under tension:
Bulgarian split squats (creates flexibility/length through the quad of the leg on the bench and glutes of the standing leg): Place one leg behind you on a raised surface such as a bench and the standing leg is firmly on the floor in front. Your hips should be facing forward. Make sure they are not rotated back towards the leg that is on the bench. Bend your knee of the front leg to lower down towards the floor. Almost all of your weight should be on the front leg. Keep your hips level so that one does not drop to the floor. Then press up through that leg (heel and toes) to return to standing.
Lunge hip rotations (creates flexibility/length through the glutes): Stand with legs staggered around hip-width apart. The weight should be mostly through the front leg. Place your hands on your hips to monitor motion and then rotate your pelvis to the right if the front leg is the right leg. This will drop your left hip down some towards the floor and bring it forwards. Make sure you are not rotating through the upper body. Then press through the right leg to push your pelvis to rotate to the left. Repeat 15x then switch to the left leg.
Please see the attached links to view videos of these exercises: https://www.youtube.com/watch?v=yGuiB6gZg1M
In our next post, we will talk about static stretching that the naturally inflexible people may benefit from:

Hittin' the Hammies
Have you been mainly stretching your hamstrings? Wait and check out this post on why to strengthen them instead!
The other day I saw a tarp over top of a shed with a few hanging flower planters attached to it. The weight of the planters was holding down the tarp equally on each side to cover the shed.
Now you’re thinking, ok so what does that have to do with exercise, the human body and physical therapy?
Don’t worry, I’m going to connect it!
We have a similar weighted pulley system in our bodies.
There are several different muscles that are attached to the pelvis that help keep it level much like the tarp over the shed with planters attached. These include the quadriceps, hamstrings, adductors and abductors.
If you picture this, then you can see why strength and some tension can be important in these muscles. The key is to get the appropriate amount of strength, length, tension and flexibility balanced amongst the various muscles groups.
If one of the planters was heavier than the other then you can easily see how the tarp would be pulled to one side making it uneven.
Similarly if our muscles are not providing the correct amount of pull down, one side or both sides of our pelvis can be tilted. Think about if both hamstrings are not taught on the back of the pelvis, then the pelvis tilts forwards.
Many people are quadricep (muscle on the front of the thigh) dominant and use these muscles moreso than some of the other muscles attached to the pelvis. This pulls the pelvis forward into an anterior tilt.
This is also why hamstring (muscle on the back of your thigh that attaches to the back of the pelvis) tension and strength are very important. They directly counter the pull of the quadriceps on the front. Though, most people’s hamstrings are not as strong as their quadriceps (and the hamstrings are over-stretched) so the quads win and pull the pelvis forward.
Have you been thinking stretching is what you need for your hamstrings?!
A lot of people’s hamstrings are actually holding on with everything they’ve got because they don’t have the appropriate length-tension relationship. So when you go to stretch them, they continue to stay tight or rebound to be tighter.
What’s the solution then? Strengthen your hamstrings!
You will notice that the tension automatically melts away when you appropriately strengthen your hamstrings (along with maintaining hip mobility through appropriate retaining exercises- see the hip mobility post for ideas). How cool is that?
Ok maybe you’re not as excited about it as I am, but now you know to stop over stretching your hamstrings and start strengthening them!
What about the other muscles around the pelvis? That’s for another post!

A Pain In The Butt
Tightness within the hip is one of the most common things we see. Here’s why its an issue and here are some exercises to help!
One common thing we see is tightness within the hip rotators (typically more with turning out/external rotation versus turning in/internal rotation). This can happen when there is too much tightness/activation within the deep hip external rotators. These muscles are located on lower portion of the back of your hip/butt. People who constantly clench their bottoms can develop tightness in these muscles and it can influence people to walk with one or both legs turned out.
When these muscles are tight, the head of the femur (ball part of the hip socket) can become pushed forwards in the socket, and now instead of only having pain because of tight muscles on the back of the hip, there is pain from the head of the femur pushing forwards onto the labrum, joint capsule and hip flexors. You can see how this would lead to being uncomfortable and cause limitations in motion.
One easy way to work on reducing this tightness is to improve hip mobility into the back of the hip socket which frees up space in the front of the socket.
If the tight muscles are pushing the head of the femur forwards constantly, the back of the socket can become more tight. Therefore as you are improving mobility in the back of the socket, you are returning your hip back to where it likes to be.
Another thing you can do to improve this is simply focusing on relaxing the muscles on the back of your hip— relax your bottom!
Not only do you want to improve mobility in the back of your hip socket, but you also want to improve strength through this new range as well.
Here are a few exercises for mobility and strength:
1. 90/90 breathing with hip shifts
Lie on your back with you knees and hips bent at 90 degrees. Your feet will be flat on the wall.
Don’t move your feet, but pull your feet down the wall as if you were scraping mud off of the bottoms of your feet. Your foot will stay in the same place on the wall, but your hamstrings on the back of your thighs will activate
Then reach your left knee towards the ceiling while your right knee is pulling towards the floor. You should feel your right femur (hip/leg bone) moving back into the socket.
Hold this position and breathe 3 times.
Then move to the other side.
Repeat 2-3x/side
2. Curtsy Lunge
Standing on your right leg, move your left leg to reach behind your left into a lunge.
You will be lengthening the outside of your right hip. Think about the ball of the socket almost pushing out to the right back side of your hip as you step behind.
Then return back to the starting position.
Repeat 8-12 times/side
Improving Core Strength and Resilience
Interested in how to spice up your core workout? Read on…
How many people are doing crunches, leg lifts, and planks during their workouts and calling it a day for their ab work?
All of these exercises have something in common; they are all sagittal plane exercises, challenging you in the same plane of motion.
While these exercises can help to recruit all of the abdominal muscles (transverses abdominis, rectus abdominis, external obliques, and internal obliques… at this time we won’t even mention the importance of the diaphragm and pelvic floor!), they largely target the rectus abdominis.
The rectus abdominis muscle is important and we certainly want to target it during exercise, but we also want to balance this out with recruitment of the other abdominal muscles. This way when we are doing everyday activities, strenuous activities and exercise, we have the core muscle recruitment and strength that we need in ALL planes of motion. You can think of this as having core muscle strength in motions that are front to back, side to side, and rotational planes.
Can you see how this would be more beneficial?
So, here are some ideas to help incorporate that for you.
Front to back plane: Sagittal
90/90 Taps: Lying on your back, activate your core and bring your legs up so that your hips and knees are at 90 degrees. Hold at 5# weight in your hands and push your arms towards the ceiling as if you are separating your shoulder blades apart so that you are activating your serratus anterior. While holding this, alternate taping your toes to the floor without allowing your back to lift from the floor. Do 10 taps total, 2-3 sets based on tolerance.
2. Side to side plane: Frontal
Side-Planks: Do a plank with your right arm and right foot on the ground. Hold your core tight as you hold this position. Make sure your hips are in neutral so that you are in a straight line from your head and trunk down to your hips. Hold this position for 30 seconds-1 minute, 2x/side based on tolerance.
To make this more challenging you can dip the outside of your right hip to the floor and then raise it back up to the starting position. Repeat 8 times/side, 2 sets.
3. Rotational plane: Transverse
Paloff press in a lunge position: Position your legs in a lunge with the left leg in front and with a resistance band attached to something stable to your right. Hold the band in your hands starting with your hands at your belly button. Activate your core and punch both of your arms straight forward in front of you. Make sure you do not rotate your trunk as you do so. Return your arms to the starting position and repeat. You can do 8-12 reps/side, 2-3 sets based on tolerance.
As with any exercise, there are many modifications that can be made to make these exercises easier or harder and you must choose the level of difficulty based upon where your body is right now.
To help with any of these exercises or for improving core strength, set-up an appointment with us and we can work on it together so that you can feel strong and capable no matter what you are doing!

How To Improve Squat Form and Learn To Squat Pain Free
If you are recovering from an injury or trying to learn how to squat without pain, this video is for you. If you are starting your journey with resistance training this video will give you a very good foundation.
The Squat Is An Amazing Exercise To Build Overall Strength
Especially when it is done properly!
Weighted back squats can improve glute, quad, hamstring, back, core strength, power, and endurance.
If you are a fan of this exercise but have been limited by pain. Or you are trying to implement this exercise into your routine this video below is for you .
Let us know if you have any questions or if you want to book an appointment click below:

Where To Start With Diastasis Recti
Where to start when exercising with diastasis recti.
Did you know there are multiple different abdominal muscles? All of these muscles help to support our abdominal cavity to keep us upright, support our trunk and help us move.
The abdominal muscles include the rectus abdominis, transversus abdominis, external obliques, and internal obliques. You may have heard of the rectus abdominis. These are the classic 6-pack abs that everyone thinks about.
As the belly grows during pregnancy, all of the muscles and fascia begin to pull and stretch. Naturally the rectus abdominis muscles in the front begin to separate, thinning the tissue at midline called the linea alba to make more room for the baby. Studies have shown that this happens in nearly all women in pregnancy. So, this is typical!
Yet, we want to minimize the separation that occurs if possible and help support it.
This is where the other muscles come into play, especially the transversus abdominis and external obliques.
The transversus abdominis wraps around your body like a corset to hold everything in.
The external obliques crisscross in front to help cinch things together in the middle as well.
So we will call upon these muscles to help support the abdomen and minimize separation of the abdominals during pregnancy as well as to help restore the diastasis postpartum.
The diastasis may or may not be so apparent during pregnancy. Sometimes people will notice a doming out the front of their abdomen at midline when they do things that increase pressure. This could be something like getting up from lying down or lifting something heavy.
Afterwards the diastasis may be more apparent when the baby is no longer taking up space in the abdomen.
The width and depth of the diastasis is measured postpartum by a therapist. Both measurements are important to know because they help to determine which exercises will be best to progress forward with.
It is important to know that improving the diastasis will take time because the collagen tissue is remodeling itself to help repair the separation. So consistent effort is key over time.
Where to start:
Start with a basic core contraction lying down with your knees bent, in sitting, or on your hands and knees.
Breathe out and contract your core.
As you contract, first think about your pelvic floor (muscles on the bottom of your pelvis) lifting in the direction towards your head and your abdominal muscles knitting together in the center. You can also think about the lower ribs in the front coming down and in together.
Think about containing the abdominal pressure inward versus pushing pressure out the front or down into your pelvic floor.
Monitor your diastasis with your hands to make sure that you do not have a bulge forwards. The center of your abdomen where the diastasis is located should be firm and the abdominals should be drawing together.
Hold for 5 seconds and then relax as you breathe in.
As you get good at this, you can progress this same contraction to other positions. Try on your hands and knees if you haven’t done that. You can try in a bear crawl position, in squats, in pull-ups etc… The key is to progress incrementally and monitor for doming.
If you need help progressing with this, let us know. We are here to help you!

Why Breathing Is An Important Exercise For Postpartum Mamas
Breathing helps to return the diaphragm, pelvic floor, ribcage, abdomen and low back closer to their prepartum shape, improving core activation and posture!
Based upon the title are you already thinking “wait, breathing is an exercise??”
Breathing is vital to us on so many levels and most of the time we do this naturally without thinking.
But sometimes our breathing pattern changes based upon a variety of factors. Pregnancy is one of those times when our breathing pattern changes purely based upon the mechanics of a growing baby inside the abdomen.
When the baby is growing, especially at the end stages of pregnancy, the abdomen has to make room for the baby. Think about how the abdominals are stretched as the abdomen gets bigger. And how the organs are pushed to different places to accommodate the baby. This increase in abdominal size increases pressure upwards on the diaphragm and downwards on the pelvic floor, which can cause both the diaphragm and pelvic floor muscles to change shape. The lower ribs also widen to make room for the growing baby.
[[Side note: the diaphragm is a muscle attached to your ribcage and spine that actively contracts to descend/flatten with an inhale and passively returns to a dome shape with a relaxed exhale.]]
During pregnancy, it could have been difficult to take a deep breath because the baby was taking up the room where the diaphragm would normally descend into the abdomen. The muscle recruitment within the core was also changed which can affect which parts of the diaphragm are being used…. Yes there are different parts to the diaphragm. That’s for another post!
Then postpartum, the baby is no longer taking up room in the abdominal compartment of the mama, but the changes mentioned above remain. Certain areas are stretched out, especially the abdominal muscles and pelvic floor and other areas are tightened including the back musculature.
This is where the breathing exercises come in to help. The breathing exercises are the start to returning your core back to what you want it to be while also helping with posture!
Here’s how to start with breathing as an exercise. We will keep it very simple:
Lie on your back with your knees bent and a small towel roll (washcloth or small hand towel) under lumbar spine if it is comfortable. You can place the rolled up towel at your back just below your ribcage and above your hip bones.
Place one hand on your chest and one hand on your abdomen.
Breathe in thinking about your ribcage expanding in all directions: up and down, side to side, front and back. You can think about your ribcage as a ball and you are expanding equally in all directions of the ball.
Monitor with your hands during the inhale: you should have relatively equal movement in your chest as your abdomen. You should not only be breathing into your belly and likewise you should not only be breathing into your ribcage.
As you breathe out, think about your pelvic floor lifting from the inside towards your head (this is not a pelvic tilt!) as your ribcage gently falls.
At the end of your exhale, hold for 5 seconds before breathing in again.
Practice 8-10 times, 2-3 times per day.